Pages

  • twitter
  • facebook
  • rss

Christmas in July–Lattice Christmas Card Display


Please welcome Missy of Lookie What I Did for Day 6 of Christmas in July!
**********************************
Christmas in July Special Event


I am so happy to join you for the Christmas in July event sponsored by those Texas gals at Cowgirl Up link parties.  We had just arrived to our new home in Calgary, Canada when Samantha from Crafty Texas Girls asked me to participate.  Since my craft room is still in boxes, I was forced to create something that was simple and appropriate for the Christmas holidays.  The inspiration came to me at Home Depot last week when I spotted a sheet of lattice in the back of the store.  I hope you enjoy this simple, clever and cheap way to display all of those greeting cards you receive during the holidays.  Here is how it was made.


Supply List

Lattice - Size of your choosing
Clothespins
Spray Paint for Lattice
Spray Paint for Clothespins
Hot Glue Gun
Sandpaper for distressing clothespins
Decorative topper of your choice (use what you have from Christmas past)
3M Command Hooks and Picture Velcro Strips for hanging the finished lattice

Total Cost of this project was $20.00

Let's Get Started......

Home Depot cut a sheet of plastic lattice into two equal size pieces.  The lattice used in this project cost about $10.00.  I then went to Michaels and purchased two cans of spray paint and some clothespins.  I chose a sage green and ivory for my colors because I plan to leave the lattice up year around, changing the topper for each season, so I wanted neutral colors (instead of bright red).


Start by laying the lattice out on paper and spray painting it.  It took only one can to cover the entire piece and it dried very quickly.

I have always used boxes to spray paint clothespins.  It's so much easier and the coverage is perfect.

Here are the clips after they have dried.  I distressed them using a small sanding block.  Just rough up the edges all around.  This took less than five minutes for all of the clothespins.

Before Sanding


After Sanding

When all of the clothespins are distressed, you can lay them out on your lattice to see how you want them to look.  I skipped every other row and hung them on alternating columns. 


Now that you have them placed on your lattice, start hot gluing the clothespins. 

Here are the clothespins hung on the lattice.  You can see how I skipped a row and then hung the clothespins on every other column.  I chose this layout so that the cards hanging on the pins would stagger each other rather than overlap.


For the topper I decided to use my Christmas tree decoration from last year!!

I simply layered the garland and created bunches on each end.  The bunches were secured with cable ties.

Start by placing two of the same branches below....

Layering two different ones on top....

Then the third layer.....

Securing them with cable ties.....

It will look like this......

I took the same bow from my Christmas wreath last year and simply adhered it to the middle of the branches with floral wire.....
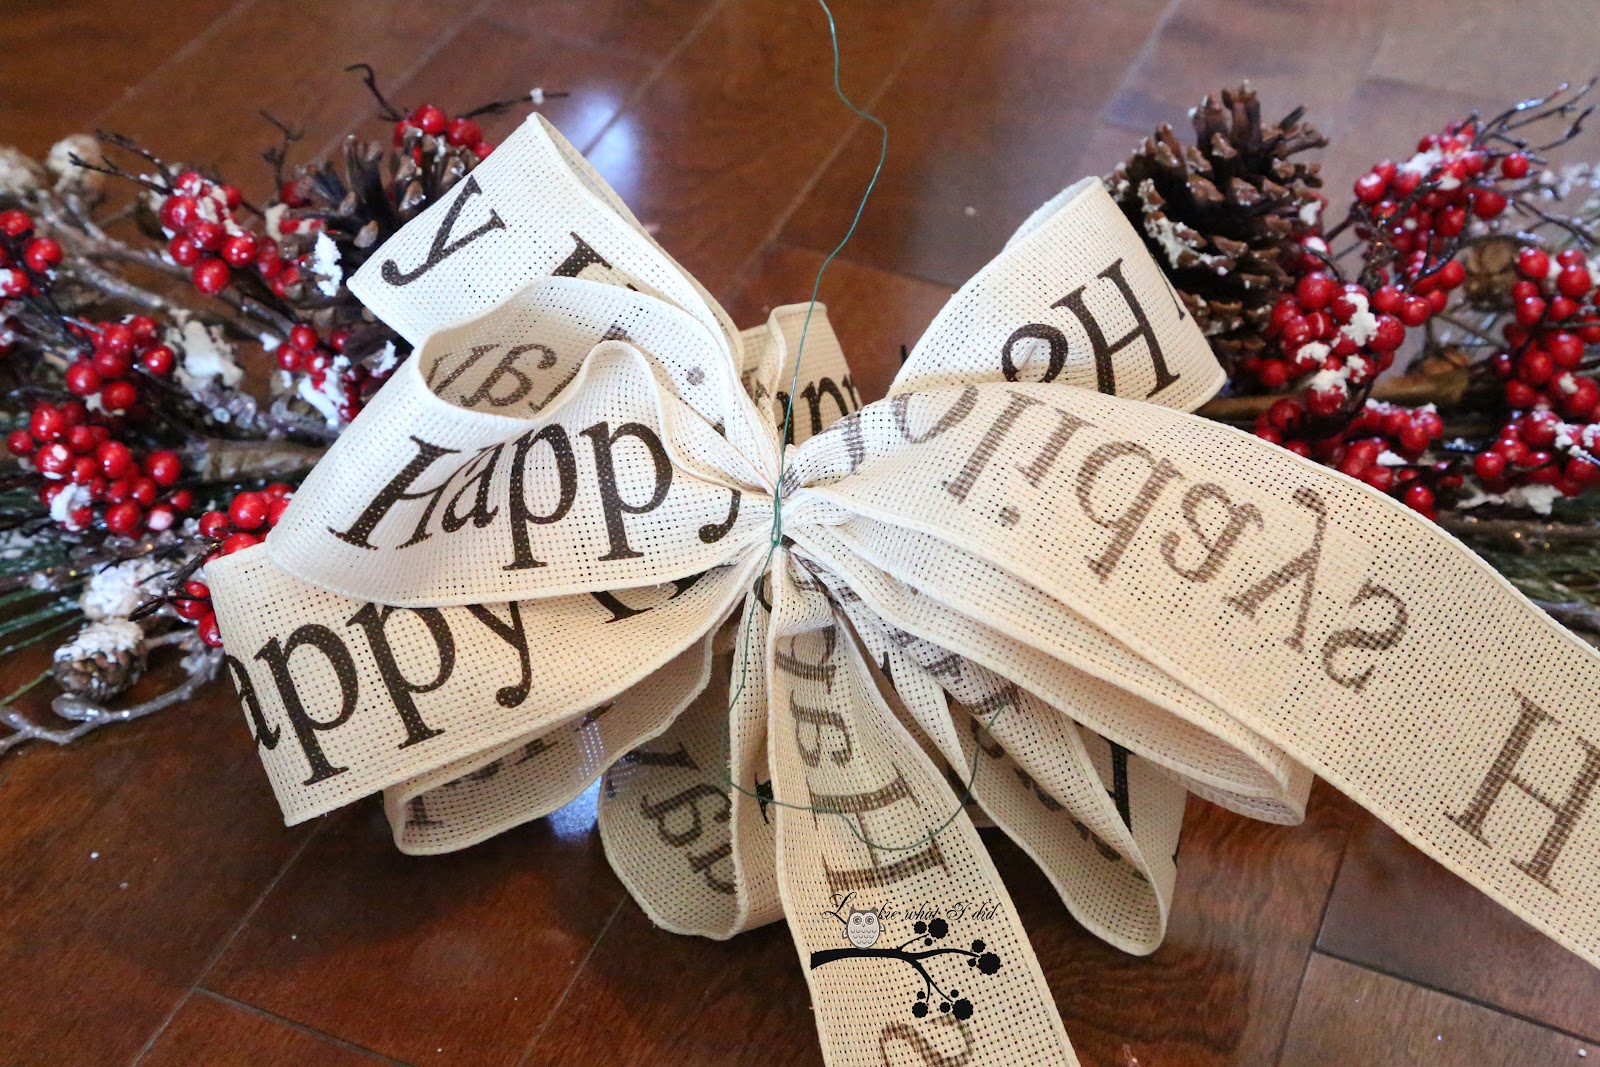
Ta daa......


I took some floral wire to adhered the branches to the top of the lattice.  After this I simply used 3M hooks and velcro picture hanging strip to hang the finished lattice on the wall.  You can use nails if you prefer.  I used the heavy duty hooks for the top layer with the branches and for the bottom lattice I simply just used two 3M picture hanging velcro strips.  You can find all of these at your local craft store.


It was time to grab some old Christmas cards (the only ones I could find) and display them. 


I hope you have enjoyed reading this easy and fun way to display your cards.  I can't wait to decorate it for the different seasons.  I think this lattice will come in handy to display every day photos, school notes, birthday invitations, school work, etc.  I'm not just going to store this in the closet and drag it out every Christmas.  This is going to be a permanent stay in my house.

Merry Christmas.....in July

While you're in the Christmas spirit, please feel free to take a "Lookie" at some other Christmas crafts I created last year.....


Thanks for stopping by!!

Missy


Feel free to check out all of the blogs!  Here are the links


[ Read More ]

Christmas in July—Sharpie Plates

Please welcome Samantha of Crafty Texas Girls for Day 5 of Christmas in July!
**********************************

Welcome to Day 5 of "Christmas in July"
hosted by Cowgirl Up!


Sharpie Plates
I am Samantha from Crafty Texas Girls. I am so excited to share my fun and easy "Sharpie Plates" with you today!


Like any good crafter, I love finding 'vintage treasures'. And on a recent thrifting trip at our local Goodwill, I came across these pretty white plates. So for $6, I snatched up 4 coffee cups and 4 plates.


How to Make Your Own Sharpie Plates
Inspired by a project I found via Pinterest, I decided to use my 'new' plates and a Sharpie marker to create some Christmas dishes. 
One of my favorite color combinations is black and white, so I loved the contrast and simplicity of this project. I used a piece of tape to make a 'guide line'-- it helped me keep the letters straight. Then I free-handed some polka dots on the edge of the plate and on the mug. If you make a mistake, don't worry! Just use some fingernail polish remover to wipe away the ink.


Finally, I baked the dishes in the oven for 30 minutes at 350 degrees. Then let them cool, they will be hot!
How to Use Your Sharpie Plate
When the holidays roll around, these plates can be used so many different ways!
-For serving Christmas breakfast
-On display in a Christmas vignette
-Or even filled with Christmas goodies and given as presents to the neighbors.
Be Creative 
I loved making this funky mug. The doodle was inspired by this plate.


And my favorite dish ended up being this one, my daughter made it!


Is is December Yet? 
I can't wait for December to roll around so I can incorporate these plates into my Christmas decor.

See More Crafty Inspiration on my Tutorial Page
If you are a new reader, I hope you'll stop by and visit Crafty Texas Girls- my girls and I are always working on something crafty and fun. Check out the newly updated tutorial page for lots of great home decor, parties, sewing, recipes and family centered projects.  You can also find me on Pinterest, Facebook, and Twitter.

What would you make with a sharpie marker and some white dishes? What Christmas crafts are you excited to try this year? Stay tuned, "Christmas in July" continues tomorrow with my friend Missy from "Lookie What I Did"!


[ Read More ]

Christmas in July—A Vintage Christmas Card Pillow

Please welcome Debbie of Confessions of a Plate Addict for Day 4 of Christmas in July!
******************************************************
Christmas in July buttonWoo hoo! There’s a whole lot of partying going on tonight! First, we are on Day Four of the Christmas in July Party and it’s my turn to host! This is Debbie at Confessions of a Plate Addict and I am so excited because I have a fun and easy Christmas project for you! And…it is also time for Week 25 of the Cowgirl Up! Link Party! That’s a whole lot of inspiration all in one place! Vintage Christmas Card Pillow First, I’d like to show you my Christmas project…a vintage Christmas card pillow! In case you are new to my blog, I should explain that I could almost rename it Confessions of a Pillow Addict! And this one is super easy and fun to make. Winter Song Birds - a Vintage Christmas Card Illustration I started with a vintage Christmas postcard and added a craft scissors border from Picmonkey. Next, I printed it on iron-on transfer paper and applied it to a scrap of linen, following the directions on the package. I have already flipped it for you to make it easy! (postcard credit Royce Bair/ The Stock Solution) berry pillowI left the raveled edges of the linen to give it a more vintage look and stitched it to a burlap pillow cover that I made.  I used an envelope closure (tutorial here) for the back of the pillow because I have a storage problem for my many pillows and need to be able to change the covers! lol berries Finally, I used the glue gun to add a few felt holly leaves and red pom pom berries to finish it off and add some interest and texture. You can find a pattern for a holly leaf shape here. Vintage Christmas Card Pillow And here’s another look at the finished project! I really like the way it turned out! And it was practically free since I had almost everything on hand…including the down pillow form from Goodwill for under $3.00! Woo hoo! Behind it, there’s a pillow I made from a Goodwill sweater last winter topped by a burlap flower (flower tutorial here.) Sooo…now I am thinking…what will my theme be this Christmas? 020Last year I used some old drapery panels to create a French ticking, mercury glass and burlap themed Christmas. (Click here to have a closer look.) IMG_4378And the year before I used vintage sheet music, mercury glass and burlap in my Christmas decorations. (You can get a closer look at these decorations here.) Hmmm…are you seeing a pattern here? 015Our co-host Baby Kitty is pointing out that I seem to be using burlap every Christmas! And it looks like I’m already headed that way again! This year maybe holly, birds and...what else...burlap? lol What about you? Are you thinking about  Christmas yet? Do you have a theme in your decorations? Christmas in JulyBe sure to come back tomorrow as our Christmas in July Party continues to see more Christmas ideas and inspiration!
Feel free to check out all of the blogs!  Here are the links:
And now...on to the Cowgirl Up! Link Party ! And…the party will have a little different twist this week!
Welcome to Week 25 of
Cowgirl Up! Link Party . . .
the party with a cowgirl can-do spirit!
1 Party, this week 8 Blogs
Because of the Christmas in July event this week, we won't be including any features from last week.  We hope you will join the fun as Cowgirl Up is on 8 blogs this week, woo hoo!!
And since we are all celebrating Christmas in July this week, we encourage you to link up your favorite Christmas projects as well…current or past!
Now about the party...
You link up on my blog and this week your link will show up on EIGHT blogs.
More exposure, less time.
We are looking for the latest and greatest projects, tutorials,
ideas, crafts, recipes, decor, and inspiring stories.
Anything that you are proud to show off.
Cowgirl Up! is the link party that saves you time and brings you inspiration.
Doesn't get any easier than that!
What blogs will your link appear on? Check us out below!
Anita with Cedar Hill Ranch
Samantha with Crafty Texas Girls
And this week, we also have 4 guest hosts:
Debbie @ Confessions of a Plate Addict
The four of us are all Texas bloggers, but you don't have to be Texas, country, western, or own horses to participate in Cowgirl Up! You just need that "can-do", cowgirl spirit!
Cowgirl Up! Link Party Guidelines:
(Please read the guidelines before participating)
* When you link with Cowgirl Up!, your link will automatically show on four different blogs. Awesome!
* Please follow your host blog before linking up on GFC (and if you have a linkyfollow account, then please follow that way too.)
* You may link up decor, DIY, crafts, guest post, recipes, giveaways, sewing, inspiring stories, and anything that you feel related to the listed categories.
* You may link as many links as you want.
* Be sure to include the Cowgirl Up! Button or text link to Cowgirl Up in your linked post, (mine can be found on my sidebar.) Mandatory to be featured!!
* Be courteous and visit the two links before yours.  Several projects will be featured each week!
* By linking up you are agreeing that we may use your photos to feature your project in a blog post, on Facebook, Pinterest, or Twitter with a link back to your blog of course.
[ Read More ]

Related Posts Plugin for WordPress, Blogger...