Pages

  • twitter
  • facebook
  • rss
Showing posts with label cedar chest. Show all posts

Another Cedar Chest

One of my sisters lives about 45 minutes away from me.  It’s not too far…except that it’s TOO FAR too much of the time!  We both like to watch the on-line classified ads, and the funny thing is that everything I want seems to be near her, and everything SHE wants seems to be near me!
Anyway, my sister loves cedar chests as much (if not more) than I do!  Last summer I finished this one for her:
Larachest 010
She is an amazing seamstress, and she needed somewhere to store her vast collection of fabric.
The hunt didn’t end there…next there was this one which she wanted to have refinished for her oldest daughter.
chairs 006
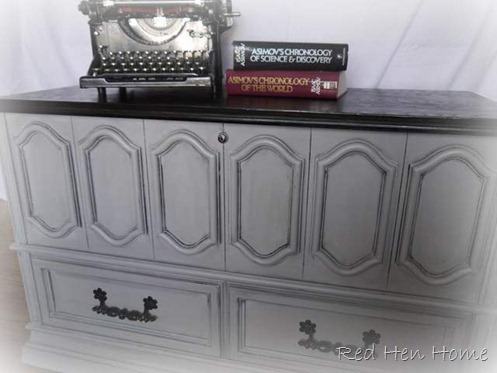
I painted the base in a soft gray “oops” paint that I transformed into homemade chalk paint.
Kali 005
I used a black glaze to highlight the pretty moldings…
Kali 001
…and I painted the handles with oil-rubbed bronze spray paint.
Kali 002
I used “ebony” Minwax stain (for the first time) on the top of the chest, and I really liked it!  I think it took three coats to get the color as dark as I wanted, but I like that you can still see the wood grain through it.
Kali 003
The bottom drawer had originally been felt-lined, but the felt had—shall we say—“decomposed” over time!  I sanded out the fuzzy remains, and then lined the drawer with a fun pink fabric (I used Mod Podge under and over the fabric to seal it in there).  I think it is my favorite feature of the whole chest!
Kali 004
Just yesterday I picked up another cedar chest for my other niece…so I need to get motivated to paint some more furniture!
…and…the weather needs to warm up!
Unfortunately (but predictably), the groundhog saw his shadow, so there’s six more weeks of winter for Utah!
*********************************
Linking up here:
Coastal Charm’s Nifty Thrifty Tuesday Elizabeth & Co.
Domestically Speaking’s Power of Paint Stylish Once Again
Thrifty Décor Chick Before & After No Minimalist Here’s Open House Thursday
Friday Remodelaholic 2805
My Simple Home Life’s Simple Creations Friday Miss Mustard Seed’s Furniture Feature Friday
Funky Junk’s Saturday Night Special The DIY Show Off
Primitive & Proper I Heart Naptime
Beyond the Picket Fence’s Under $100 Party My Uncommon Slice of Suburbia
Perfectly Imperfect {Primp}
Simply Klassic Sundays My Repurposed Life
  It’s So Very Cheri
Common Ground  
[ Read More ]

Cedar Chest with DIY Chalk Paint

I think I’m frugal.

My husband calls me cheap.

Like that’s a bad thing! (Whatever.)

What does that have to do with furniture?? Well, it means that despite great temptation, I have not made the switch to chalk paint. Despite all it’s good qualities, I can’t justify the price.

However….

Last week Sherry from No Minimalist Here posted about how to make your own CHEAP chalk paint!

I was very intrigued.

Sherry gave three suggestions for additives to make your own chalk paint: calcium carbonate, Whiting powder, or Plaster of Paris. Reading through the comments, another suggestion from Carole at Maynard Greenhouse was to use unsanded tile grout was to use unsanded tile grout, and that’s what I chose to use because it’s what I found first! Note: the grout comes in different colors; I bought white.

I started with this cedar chest I bought off a classified ad:

moustache 002

It was advertised as a “Mediterranean-style” chest, and I don’t really know what that means…but I’m going to go with it!

I mixed 2 T. unsanded tile grout with each cup of ordinary latex paint. It gets VERY THICK, so I diluted with at least 1/4 c. water, I think…then I got to brushing! And despite my misgivings, I did not sand or prime.

moustache 003

The paint was still VERY gritty, no matter how much I stirred it (I would love to know if the other homemade versions are the same). However, as it dried most of that magically disappeared. And…there were no brush marks!

I was virtually painting in the dark, so I noticed the next morning that I had some drips. I got out the sandpaper. With latex paint, sanding drips is usually a disaster, as it all just peels off, and I never seem to be able to make the flaw blend in again. With the homemade chalk paint, that did NOT happen! I was able to sand the drip down until it was invisible, with NO peeling paint.

I painted the whole chest with two coats of red (the same red I used on the retro buffet), but I wasn’t feelin’ the love.

So next I combined the leftovers from the three sample pots I used to paint the gradient dresser, tossed in more unsanded tile grout, and painted again.

Much better.

mediterranean 033

I glazed this piece with a diluted white acrylic paint, and then I also distressed it quite heavily.

mediterranean 027

True to the hype, the paint sanded away into powder. That also got rid of the last bit of grittiness. You do have to sand A LOT, though. When it’s smooth, it feels just like…chalk!

mediterranean 028

There was one spot which, when sanding, peeled away as latex paint is wont to do. I attribute that to a not-very-well-mixed spot of paint. When that happens when I’m distressing a piece, it makes me cringe…it’s SO hard to cover up a spot that peeled away.

mediterranean 029

This time, though, I “filled in” the bare spot with two coats of the DIY chalk paint, and sanded again. You can’t see a difference.

mediterranean 031

Overall I would say I’m quite impressed with the DIY chalk paint. The biggest ‘con’ in my book is that it would not go through my Harbor Freight paint sprayer. And let’s face it, painting spindles and detail work by hand takes F.O.R.E.V.E.R! And I don’t think you get as good of coverage or as smooth of a finish that way.

But since it’s also a bugger to sand spindles and detail work—it may be a bit of a wash!

I finished this cedar chest with Minwax paste wax in natural. No, I haven’t purchased the more expensive/better waxes either—I told you I was cheap frugal!

mediterranean 032

So, will I try it again? Absolutely.

Am I going to give up on latex paint for furniture? Not for the moment.

Just another tool in the arsenal. And that, as Martha would say, is a good thing!

I would love to hear your thoughts about DIY chalk paint (what versions have you tried?), as compared to Annie Sloan, or to latex paint! What do YOU think the pros and cons are?

*******************************************************

This project was featured at Mod Vintage Life.

******************************************************

Linking up here and The DIY ShowOff.Link

[ Read More ]

Can’t stop the classics!

I very much enjoy playing with fun colors, typography, stencils, and all the rest. But there is a look I keep coming back to—that of a warm wood top paired with a creamy glazed base. I love it for dining tables (like this and this), end tables, and I love it for cedar chests!

My sweet sister wanted a piece of furniture for the end of her bed. We discussed a bench, but finally settled on a cedar chest so she would have someplace to store her stacks of fabric (she’s an amazing seamstress). She found this chest through the on-line classified ads for only $30, and I picked it up for her:

Larachest 003

It’s a good Lane-brand chest, and it even still has the key! The top is all cedar-lined, and the bottom has a drawer. She pretty much gave me carte-blanche to fix it as I liked, but I knew she liked the wood top/painted base combination.

So here’s what she got to take home!

farmhouse style cedar chest

The top is stained with Minwax Antique Walnut stain. I was at the very end of the can—and I found that it gets very thick at the bottom if you aren’t good about stirring it before each use (obviously I didn’t!). It actually gave a new and different effect to the top of the chest. In some places, the stain went on almost like paint, and could be sanded off to leave interesting lighter streaks. I kind of liked it!

stained top cedar chest

I chose to change the hardware on this piece (I found the new pulls at Hobby Lobby), which involved filling all the old holes and drilling new ones. (I swear, sometimes that process takes as much time as the painting does!)

Lane cedar chest

I like how the fluted shape of the knobs echoes the shape of the fan.

The base, by the way, is painted in Behr Ultra paint. I had them color-match Sherwin Williams “Creamy” paint.

painted cedar chest

I don’t have any “before” pictures of this next chest, but I thought I’d toss the “afters” in here for comparison’s sake!

As you can see, this chest is very similar (it also has a bottom drawer), and it received almost the identical treatment.

cedar chest

The knobs and pulls were interesting on this piece. They were a Southwestern style, had a very brassy finish, down to a faux green tarnish in the details. What is a Southwestern style knob, you ask?

refinished cedar chest

Well, imagine a knob that has a stylized fish carved into it! It was not my favorite look, even after painting it all with Krylon’s oil-rubbed bronze spray paint. I replaced all the knobs with plain round knob from my stash. (I kept the pulls. They have some angular carvings on the ends, but I could live with them.)

painted cedar chest

I adore cedar chests!

painted cedar chests

Here are the two side by side:

tallcedar

Which one do you like better? Why?

*********************************************************

This project has been featured at West Furniture Revival.

Linking up here!

[ Read More ]

Spring Market, part 1

As I have mentioned before, I participated in my first ever "public showing" of my handiwork yesterday: the "Scraps of Simplicity Spring Market."

I was a real newbie at this whole boutique thing! I like to attend them, but I've never tried to sell at them! Thanks to wonderful, generous, unselfish friends, I was able to pull it off. Here are some pictures of my booth!

Recognize my 38 Flowers Dresser?


And there were lots of painted signs and trays.

And chalkboards...mostly HUGE ones!

This little toy box was a favorite of mine. It was blue when I bought it, and I tried painting it red, but that wasn't "it." In the middle of the night (seriously!), I suddenly knew it was meant to be yellow and say "You are my sunshine." I love that it turned out like the picture in my head!


This little black cedar chest was the first thing sold, I think--
to the people who had the booth next to me!


If you look closely at the next two armchairs, you might recognize them from long ago in this post. I painted the legs brown shortly after that, and liked them much better. They've sat in my front room for months, but without any trimming! I finally got around to trimming them within the last week, and I took them to Market. Lots of people seemed to like them, but they didn't sell--that's OK, though, at least they're finally finished for ME!


See the little pillow on the chair? It was my first attempt at spray-painted fabric (a drop-cloth to be exact). Next time I need to let the paint dry more before I assemble the pillow!

I love the cute headboard behind the chairs.


More to come...but what do you think so far?


Photobucket


topsy turvy tuesdays


Savvy Southern Style

Catch As Catch Can


[ Read More ]

It's Di~Vine!

If you live in the Ogden/Salt Lake City area, you really should stop by Di-Vine Consignment(4510 S. 900 W.) this week for their Grand Opening Celebration! They will be having prize drawings today and tomorrow.

I became friends with the owner through some mutually beneficial transactions. She bought this cute headboard from me:

as well as this cedar chest:


and I purchased this bench from her (it was originally yellow; I repainted it).

Recently she let me into her "workroom" where she literally has stacks of furniture waiting to be redone/refurbished/updated/glorified (whatever)! She has her work cut out for MONTHS, if not years! She commissioned me to finish a dining set for her so she could sell it in her shop.

There are six chairs; one is an arm chair:


And look at these gorgeous table legs!


My first step was to sand down the table top...

...and that's where the trouble started. The veneer was loose and dry in several places along the edge, and the sander ripped some pieces right off. Argghh! The plan had been to stain the top, but missing veneer poses a problem.

I wondered, though, how bad could it be? So I filled in the missing places with wood filler, and stained it anyway. Yeah, not so good. Although wood filler is "stainable," in a large area you really miss seeing that pretty wood grain!

Strike 1.

Then I thought about "faux painting" the wood-filled area to simulate wood grain. I broke out my paintbrushes and acrylic paints, and gave it a go. Hmmm...it didn't seem too bad... Stain it again. Color's good, but the texture--still bad.

Strike 2.

Forget about stain. Let's just paint the whole top, and then see what glaze can do. Hmm. Not bad, but kind of bleahh.

Strike 3.

This is getting ridiculous! And yes, in baseball I would be "out." Thankfully it doesn't work that way with furniture. ;-)

In sheer desperation, I pulled out my leftover can of MinWax Polyshades in Antique Walnut. I had tried it on another project, and I was less than impressed. This time, I was hoping the maybe the color in the polyurethane would give an extra depth of color to the plain brown painted top.

Whaddya know...it worked!


{huge sigh of relief}

Magically, blessedly, it worked. The color was lovely; it glowed. I had to take back all the nasty things I said about Polyshades in the past.

As you can see, the apron of the table and the chairs were painted in Rustoleum's Heirloom White. I glazed everything with burnt umber craft paint afterward. Here are the pretty leg supports. They were a late arrival; they had been misplaced and weren't with the rest of the set!


Look at the beautifully detailed table legs!


Here's the pretty arm chair:


The owner was going to cover the seats herself. See the pretty fabric on the top of the table? It's brown with a turquoise and ivory pattern. However, as people have come to look at the set in the shop, not everyone has been impressed with her choice! So for now, she's going to leave the seats uncovered and offer the buyer their choice of fabric for the seats.


Here's a last pretty picture!


And coming soon...wait until you see what I got in exchange! (Hint: it wasn't money!)

Furniture Feature Fridays
Funky Junk's Saturday Nite Special

The DIY Show Off

[ Read More ]

Related Posts Plugin for WordPress, Blogger...